Settings
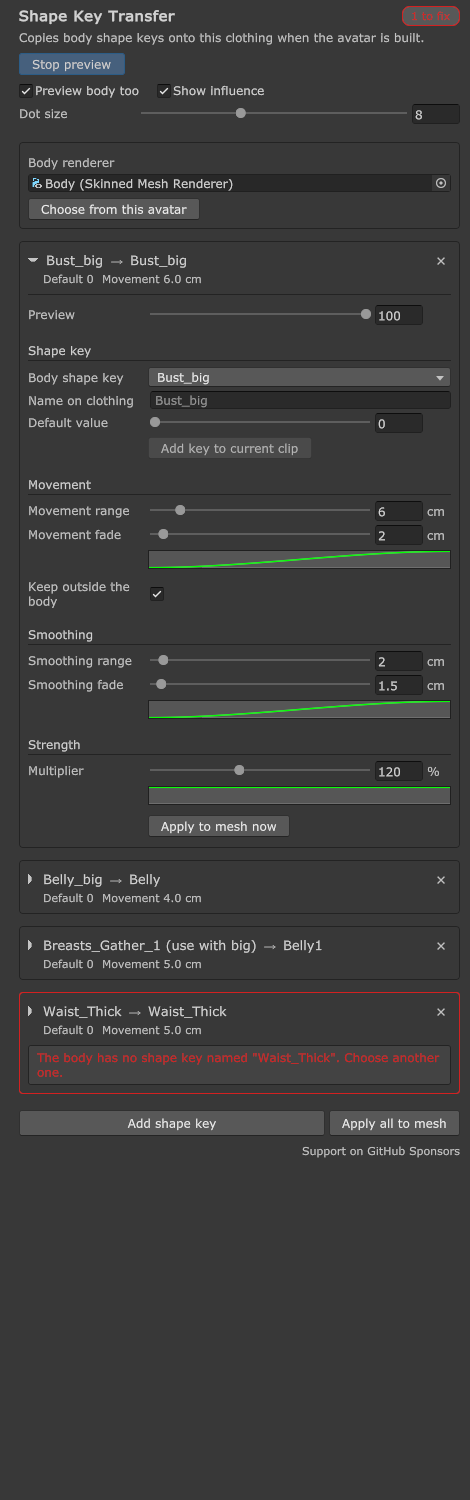
One entry is one shape key that will be created on the clothing. The entry has four groups: Shape key, Movement, Smoothing and Strength.
Shape key
| Setting | Description |
|---|---|
| Body shape key | The body shape key to transfer. Choose it from a searchable list. |
| Name on clothing | The name of the shape key created on the clothing. If empty, the body shape key's name is used. |
| Default value | The shape key's value after the build (0–100). |
Movement
| Setting | Description |
|---|---|
| Movement range | Only clothing within this distance of the moving part of the body follows. It is shown and entered in centimetres at the avatar's current size, and grows by the same ratio when you enlarge the avatar. The slider goes from 0 to 50 cm and widens when a larger value is stored. |
| Movement fade | The movement fades out over this width at the outer edge inside the Movement range. At 0 it cuts off sharply at the edge of the Movement range. |
| Movement fade shape | The curve under the Movement fade slider. It sets the strength of the movement within the Movement fade, with the edge on the left and the inside on the right; higher means stronger. At 1 the clothing moves fully and at 0 it does not move. The default curve weakens smoothly toward the edge. Click the curve to open the curve editor. |
| Keep outside the body | When the shape key is raised, clothing is pushed out to 1 mm from the body (scaled with the avatar). Clothing that was already buried in the body comes out too. On by default. Only clothing inside the Movement range is affected. |
Smoothing
| Setting | Description |
|---|---|
| Smoothing range | Each clothing vertex takes the area-weighted average of the body's movement within this distance, around the point of the body surface closest to it. Clothing whose vertices are sparser than the body's then follows smoothly instead of forming sharp points. The default is 1.5 cm. At 0 it follows the movement of the nearest point on the body exactly (the previous behaviour). A wider range spreads a narrow bump wider and lower. |
| Smoothing fade | The width of the band at the edge of the Smoothing range that counts less in the average. The default is 0.75 cm. |
| Smoothing fade shape | The curve under the Smoothing fade slider. It sets how much the body counts in the average within the Smoothing fade, with the edge on the left and the inside on the right; higher counts more. At 1 it counts fully and at 0 it is left out. |
Strength
| Setting | Description |
|---|---|
| Multiplier | Multiplies the transferred movement (0–300%, default 100%). Above 100% the clothing is pushed further than the body. It is applied after Keep outside the body, so below 100% the clothing can sink into the body. Use it to restore height lost to Smoothing. |
| Strength by distance | The curve under the Multiplier slider. It sets how strongly the clothing follows, depending on its distance from the moving part of the body (the end of the Movement range on the left, closest on the right). Higher means stronger: at 1 the clothing moves exactly like the body, at 0.5 half as much, and at 0 it does not move. |
The default curve, flat at 1, suits clothing that fits tightly against the body. For outerwear that stands away from the body and should swell less, use a curve that rises toward the right, so it weakens toward the end of the Movement range.
All three curves have the edge on the left and the inside on the right, and higher means stronger. So the rising presets in the curve editor are strong inside and weaken toward the edge on any of them.
Apply to mesh now
Use this to put shape keys into the clothing mesh right away instead of waiting for the avatar build. Apply to mesh now at the bottom of an entry applies that entry, and Apply all to mesh at the bottom of the inspector applies every entry the preview shows. Each asks for confirmation first.
- The original mesh is not changed. A copy of the clothing mesh with the shape keys is saved in
Assets/ShapeKeyTransfer/Applied/and assigned to the clothing's SkinnedMeshRenderer. If the file name is taken, a number is added. - The new shape key on the clothing is set to the entry's Default value.
- Applied entries are removed from the component. Clips that key them are no longer retargeted to the new shape key on the clothing in the avatar build, so record them again on the clothing's SkinnedMeshRenderer shape key.
- Undo brings back the assigned mesh and the entries. Delete the saved mesh file yourself in the Project window.
- The result shown in the preview goes in as it is, so it matches the avatar build. With the preview off, both buttons are disabled.